In an ideal world, sales leaders would never have to badger their team for pipeline updates because they’d get automatic forecast reports directly from their CRM on the cadence of their choosing.
In reality, sales teams often fall back on old methods, like the weekly meeting where everyone reports what deals they’re working, when they hope to close and the likelihood of closing so that someone gets the fun job of entering everything into a spreadsheet.
While the weekly sales update meeting may feel like a necessary ritual for managers to stay on top of the pipeline, the fact is that creating a basic automated forecast report is easier than many realize – especially if you have a CRM like HubSpot that’s intuitive and designed with salespeople top of mind.
Today, we’ll walk through the steps to create an automated forecast report in HubSpot that you can customize and use to track sales for your business.
Define Your Data Requirements – and Make Sure Everything Gets Tracked
Before you build your forecast report, you need to be sure you’re tracking the right data.
Every business’s management and executives will have their own requests for how the data is ultimately sliced and diced, but odds are that if you’re working backward, you’ll want every opportunity to be complete with accurate and current information on the following at a minimum:
- Deal name
- Deal owner
- Revenue
- Expected close date
- Deal stage
- Win probability
There will likely be additional information that will be useful to see depending on your industry and company specifics, but if these properties are being consistently updated, you’ll at least have the building blocks for a functioning forecast report.
If your sales team doesn’t currently have a process for keeping this information current, good news: setting up the forecast report will force the issue. More on this later.
Create the Forecast Report in HubSpot
Now, it’s time to build the report in HubSpot.
First, go to reports > create reports from scratch > single object report.
Select deals as your object and create a name for your report.
Next, add the properties you want to see in your report. For example, if we’re simply for the information listed in the section above, we’d include these:

Next, select the filters you need to show the relevant deals in your report. This is where you’ll need to really consider what’s most useful and actionable for you and other stakeholders to see.
Let’s say you’re looking to have an opportunity stage forecasting report to get a weekly pulse on what deals (and how much revenue) are likely to close this month. You’d want to filter for deals that have reached a stage with a relatively high probability of closing and a close date sometime this month – something like this:
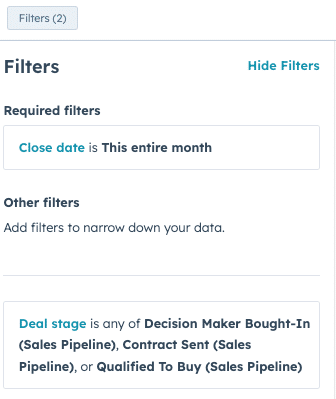
Once you’ve selected your properties and filters, you should be seeing a table with all deals including owners, revenue, stages close dates and probabilities.
While I’m usually for using visualization to help data tell a story, for this report I’ve found most people simply want the information in the table. If that’s the case, choose Table under chart type.
Clone and Tweak the Report
Now that you have your report, you may want to clone and tweak it for different variations that could be useful.
One probable example: assuming you have more than one person on your sales team, you could create variations that are filtered for deals owned by each salesperson. That way, you’d have one master forecast report and one for each member of the team.
(This is where having the report is great at getting sales teams to maintain accurate and up-to-date deals. If everyone knows that this report is going out on Tuesday mornings, just watch how the deals are magically updated every Monday afternoon.)
Along with creating variations by deal owner, you might also want to have reports for different date ranges (e.g. along with deals likely to close this month, maybe you want one for this quarter and one for this year).
Set Up Recurring Emails
If you live in HubSpot as some of us do, you may not need the reports to be emailed to you. But, perhaps you don’t live in HubSpot and want to receive a forecast report from each salesperson every week – or maybe it’s just helpful to receive the emails so you don’t have to remember to go in and check each report.
Setting this up is simple. You can either do this yourself or have your sales team be in charge of their own reports if you’re using multiple variations.
Navigate to Reports > Reports and hover on the row of the report:

Click Email this report and fill out the details for how you’d like the email to go out. I recommend setting this up as a recurring email so that you don’t have to remind yourself to do it, but you can also send one-offs.

With your reports created and email cadence determined, you’re all set up to start benefiting from automated forecast reporting.
Free Up More Time for Sales
When you’re in a busy, growing company and everyone is juggling a million tasks, seemingly minor improvements like setting up automated forecast reports can make a big impact.
Rather than spending time every week sitting in meetings and manually adding information to a spreadsheet or database, by creating an automated forecast report in HubSpot, you can stay current on your pipeline and let your sales team focus on closing deals and driving revenue.
And by the way, this is just one of many reports and automation sales teams should be taking advantage of. For more ideas, give us a shout.