In one of our most recent pieces, I helped you launch your first paid Search campaign on Google Ads (woo!). I also made a promise that I would be back to give you a hand with your paid Display Campaigns. Since I’m a woman of my word, let’s make good on that promise!
If you’ve been keeping up with our series on paid Facebook, LinkedIn and Google search ads some of today’s steps might sound familiar. But every paid advertising platform has a different process, and Google Display ads are no different. So today, we’ll specifically cover how to navigate your first Display campaign launch.
(Psst! Before we start – if you’ve missed our previous paid social blogs, I recommend checking them out now. They’ll help you understand today’s topic.)
Let’s crack into it.
What’s a Display Campaign?
Google Ads offers two types of ad campaigns – Search and Display. To review, Search ad campaigns are text-based. They appear as promoted ads at the top of your Google results, and they change depending on what keywords or search terms you use. In addition, Search ads often advertise a click-to-call button or encourage you to take actions like visiting a website, booking an appointment or ordering a product.
Today, though, we’re focusing on Display ad campaigns.
Display ads are visual and should include eye-catching graphics or video to grab your audience’s attention.
Search campaigns are meant to target the people who are already looking for businesses like yours. They’re helpful if you’re ready to target customers in the decision stage of the Buyer’s Journey, which means they’re ready to purchase your products or invest in your services. Display campaigns, on the other hand,help expand your audience and build brand awareness. . That means that instead of being triggered by keywords like Search campaigns, Google will place your ads on the websites, videos and apps where your target audience spends their time.
A Display campaign is ideal for a company looking to reach out to new customers, get their name out there and build brand awareness. It has a different objective than a Search campaign, which is typically geared for conversions.
Here’s a quick example: Say you own a bakery. If you want to target brides looking for specialty wedding cakes, you should run a Search campaign. On the other hand, if you’re more looking to get your name out there and bring in some new neighborhood business, or entice past visitors back to your website, a Display campaign is a great idea.
If you’d like to see examples of successful Display ads, check out Wordstream’s roundup!
How Do Display Campaigns Work?
Google Display ads work very differently than Search ads.
Similar to how Google has two campaign types, it has two networks for each type – the Search Network and Display Network.
On the Search Network, your Search ads will be eligible to appear on any of Google’s results pages. You’ll also be targeting audience members in real-time as they browse Google.
The Display Networks work differently. According to Google, the Display Network offers more than 2 million websites, apps and videos where your ad can appear – more than enough places to find your ideal audience. In addition, the Display Network gets your ad in front of your ideal customer by letting you target particular contexts, audience demographics, locations and more.
Here’s another example to clear things up:
Say I’m craving a croissant. If I search Chicago bakeries, I’ll automatically see Search ads for stores like Vanille or Molly’s Cupcakes. I won’t see Search ads for the new plant shop in my neighborhood because that doesn’t relate to the keywords I entered.
But, if I’m deciding to make my own croissants instead, I might see Display ads for the new plant shop, Hulu’s latest series or a true crime novel as I look up recipes. That’s because those ads are targeting me based on my demographics, not Google searches. They’re placing those ads (which would all work, for the record) throughout my favorite online haunts to catch my eye and build brand awareness.
I’m sure you’ve guessed this, but most of the time, Google runs Search ads on the Search Network and Display ads on the Display Network. I say most because Google has recently introduced Display Expansion on Search campaigns, allowing users to, “get additional conversions on the Google Display Network using unspent Search budgets at similar cost per conversion as Search.”
But for beginners, we’re going to put a pin in that conversation and focus on the basics.
Before You Start
There are a few things you should have set before we jump into building your Display campaign.
First, make sure you have a Google Ads account set up for your business. (If you don’t, these steps will help you get there!).
Secondly, let’s make sure the “Display” part of your Display campaign is ready to go.
When creating a new ad, you’ll be asked if you’d like to upload an image (within these supported sizes/formats) or create a responsive ad.
A responsive Display ad is a collection of images, copy and headlines, instead of one single file. Once Google has these assets, it will automatically generate different ads to appear on the Display Network.
With responsive ads, Google can test the success of different combinations, site placement and image sizes of your assets and focus on the most popular ones. Google breaks down the process here:
Responsive ads will even switch up your content to ensure that your audience isn’t being served the same ad over and over again. (Plus, sometimes uploading a few pictures and adding in four or five headlines can save your team’s graphic designer some time).
But you also have the option to upload your own non-responsive ads. Non-responsive ads are graphics or pictures you create and that will stay the same throughout your campaign. Instead of uploading several images or potential headlines, you’re uploading two or three JPGs that will stay the same throughout your campaign. This gives you more control over how your ads will appear online.
For beginners, either of these options are a good choice. Responsive ads put your content in Google’s hands to optimize, which can boost your performance. Or, if you have specific aspects or information that you always want included in your ads, you can upload a non-responsive ad that will stay the same during your campaign
Got your ads ready?
Let’s Get on Display!
It’s time to head to your Google Ads dashboard and click on “New Campaign.” Then, we’ll follow these steps:
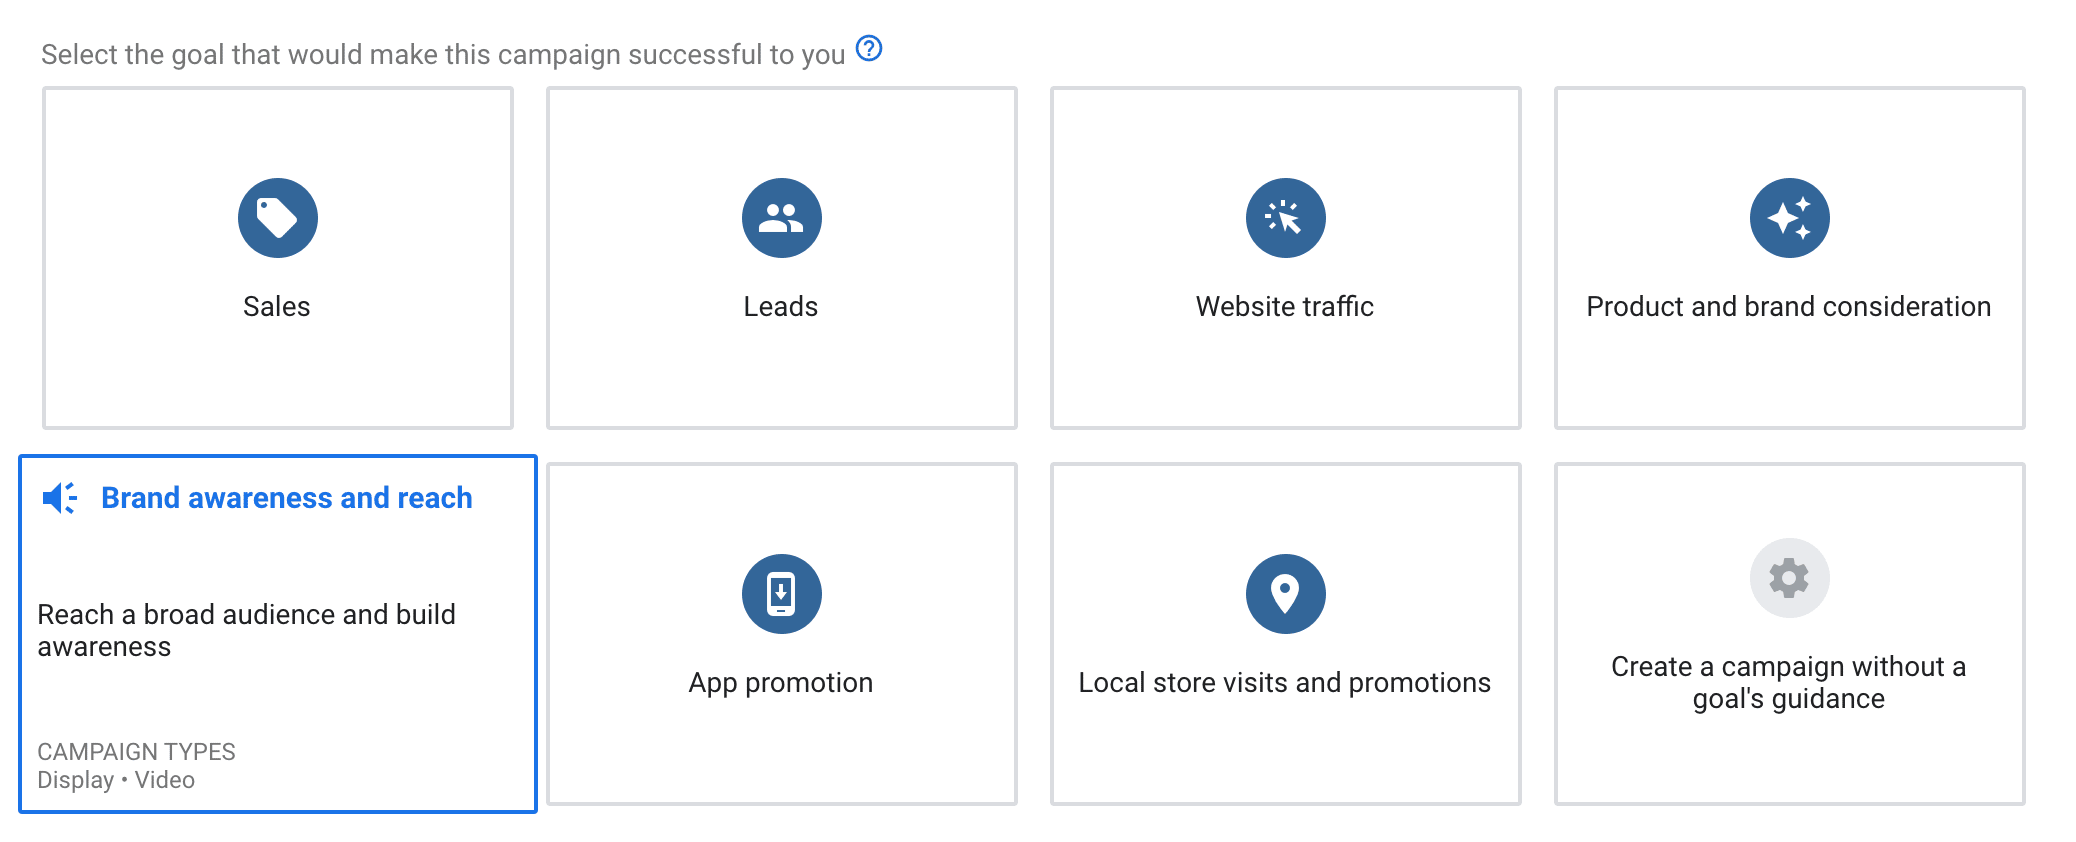
1. Choose a Goal
Just like with our Search ad campaign process, you’ll first be asked to choose a campaign goal. Display ads are eligible for four different campaign goals:
- Sales: For sales-driven campaigns, the goal is to kick off the purchasing or conversion process for new audience members or previous ones who seem close to making a decision.
- Leads: Lead-driven campaigns encourage customers to show they’re interested in your products by completing a desired action, like signing up for a newsletter or downloading a piece of content.
- Website Traffic: Website traffic-driven campaigns help users research potential products and drive traffic and users to your website.
- Brand Awareness: This means your campaign aims to reach a wide audience and build brand awareness and buzz.
As you become more comfortable with Display ads, you can experiment with using them for sales, leads or web traffic goals, which will measure other metrics like conversions or clicks.
But for our first time out (and since that’s what Display ads are best suited for,) let’s stick with Brand Awareness as our goal.
After choosing Brand Awareness, select “Display” as your campaign type, enter your company’s website URL and click “Continue.”
2. Bidding
On the next page, you’ll be asked to name your campaign, select countries you’d like to target with your ad and the languages your potential customers speak. Then, we hit the bidding section.

You’ll notice that viewable impressions will already be selected as your campaign’s chosen metric. According to Google, viewable impressions represent the number of times your ad’s impressions are considered “viewable.” Google counts an ad as viewable if at least 50% of the ad is visible for at least one second. This metric lets you know if your ad is appearing where people can easily see it.
You’ll also see a green box that says Google will use the Viewable CPM (cost-per-thousand impressions) bid strategy.
The Viewable CPM bid strategy lets you bid on 1,000 potential viewable impressions. Then, you only pay for the successful, viewable impressions. As Google explains it, “Viewable CPM lets you bid on the actual value of your ad appearing in a viewable position on a given placement.”
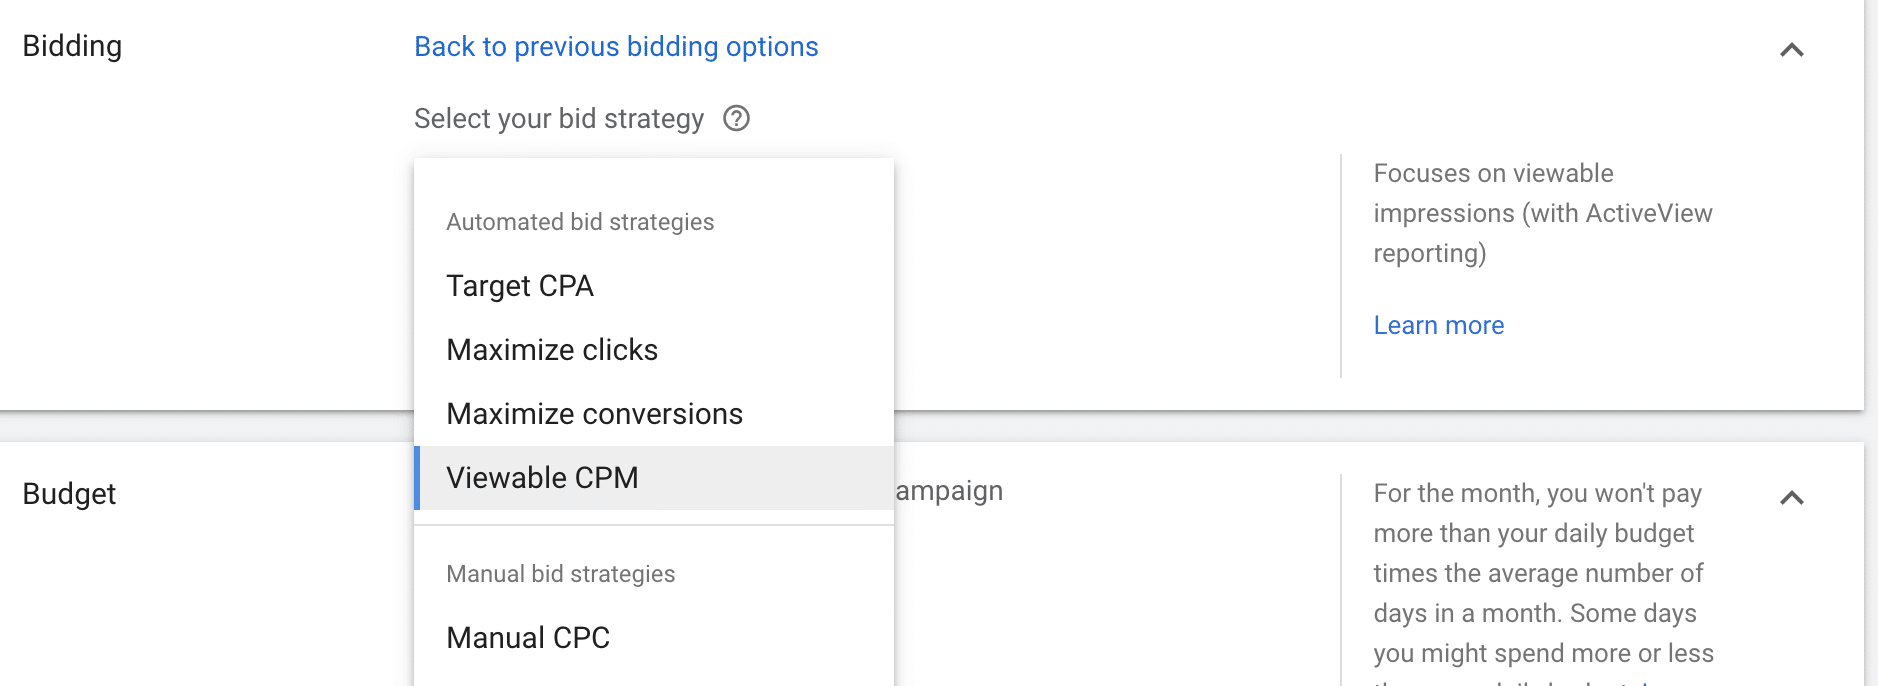
If you prefer a different bidding strategy, you can also choose between Target Cost-Per-Action, Maximize Clicks, Maximize Conversions and Manual CPC. While these are options to consider for future Display campaigns, we recommended starting with the viewable CPM bidding strategy.
3. Budget
Like with our Search campaigns, we’ll be asked to set a daily budget. Remember, Google daily budgets work a little differently than you might expect.
Google says, “For the month, you won’t pay more than your daily budget times the average number of days in a month. Some days you might spend less than your daily budget, and on others you might spend up to twice as much.”
As we talked about in our Search campaign piece, Google suggests that beginners stay within a daily budget of $10 and $50, and we agree. If you’re still unsure about what a reasonable budget looks like for your company, you can learn more here.
At the bottom of the bidding section, you’ll be asked if you’d like to use an “Individual” or “Shared Budget.” Make sure to choose “Individual.” A shared budget would spread your budget across several different campaigns, and right now, we’re focusing on only one.
4. Ad Rotation
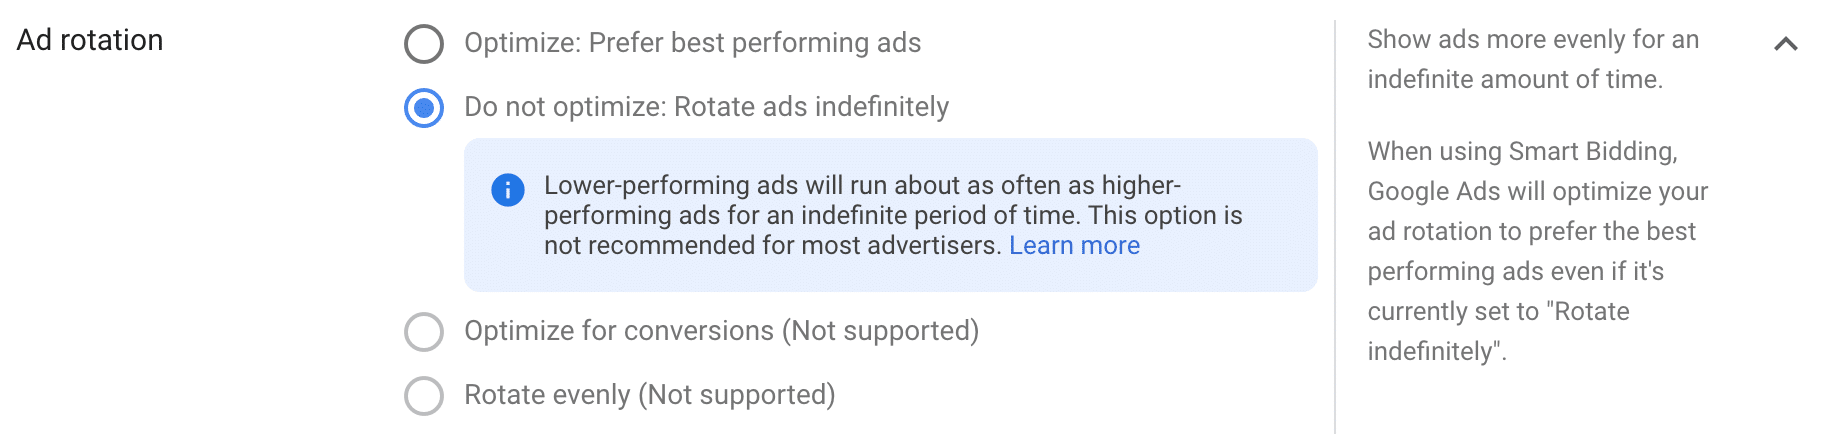
Next, you’ll be asked about your ad rotation settings, which will decide how often different Display ads within your ad groups appear.
This is a little cart-before-the-horse because you set up ad groups after deciding on your rotation settings. But Google recommends that each Display ad group has at least three to four different ads – non-responsive or responsive. (Yes, you can have multiple responsive ads! They can each test different images or different versions of headline copy, or whatever combinations you’d like.)
Google recommends choosing the Optimizing rotation strategy because it will test your ads’ performance and prioritize the most successful ones when choosing which to send out. It’s a better choice than rotating your ads indefinitely, which will send out underperforming ads an equal number of times as very successful ones.
5. Ad Groups

As we move on to creating our ad groups, you’ll first be asked to make any content exclusions. This is where you choose the content you do NOT want your ads to appear on. (And not, as you might think, the places you want your content to appear. Big difference.)
It’ll automatically choose mature content and any that isn’t labeled, which is a good start. You can also choose any additional context exclusions as you see fit.
Next, we’ll start by naming your first ad group.
Ad groups organize your Display ads within your campaign. Let’s say you’re advertising your bakery business again. Your ad groups might be segmented as cakes, muffins and pastries. Within these groups, you would test different graphics and/or responsive ads for those topics.
Like we’ve said, Google recommends that each ad group have 3-4 different responsive and/or non-responsive ads to rotate. So for beginners, we suggest you stick with 1-2 ad groups at first to avoid getting overwhelmed.
There are a few steps you’ll need to complete to create an ad group:
Choose an Audience
The Display ad group audience tool may look similar to the Search ad group tool, but as usual, it has some different features.
For Display ads, your audience is a group of people who can be shown your ads. You can build your ideal audience by choosing certain demographics like age, location or career.

If it’s your first time using Google Ads, we’re assuming you haven’t uploaded any custom audience lists to the Audience Manager. Use the “Browse” feature to pick out demographics that you’re looking to target for your campaign.
If you happen to have custom audiences that you’ve uploaded for previous campaigns, you’ll see them listed in the “Search” feature.
A key difference between Search ad and Display ad audiences is that Search campaigns allow you to upload a list of people you’d like to see your ads. Display audiences, however, won’t use your custom lists to target specific people. Instead, they’ll take them as inspiration and guidance to build a new, larger audience.
You can utilize both the “Search” and “Browse” features for your audience and then refine it even more with the next tool, labeled “Demographics.”
The following two steps may seem a little counterintuitive but bear with me.
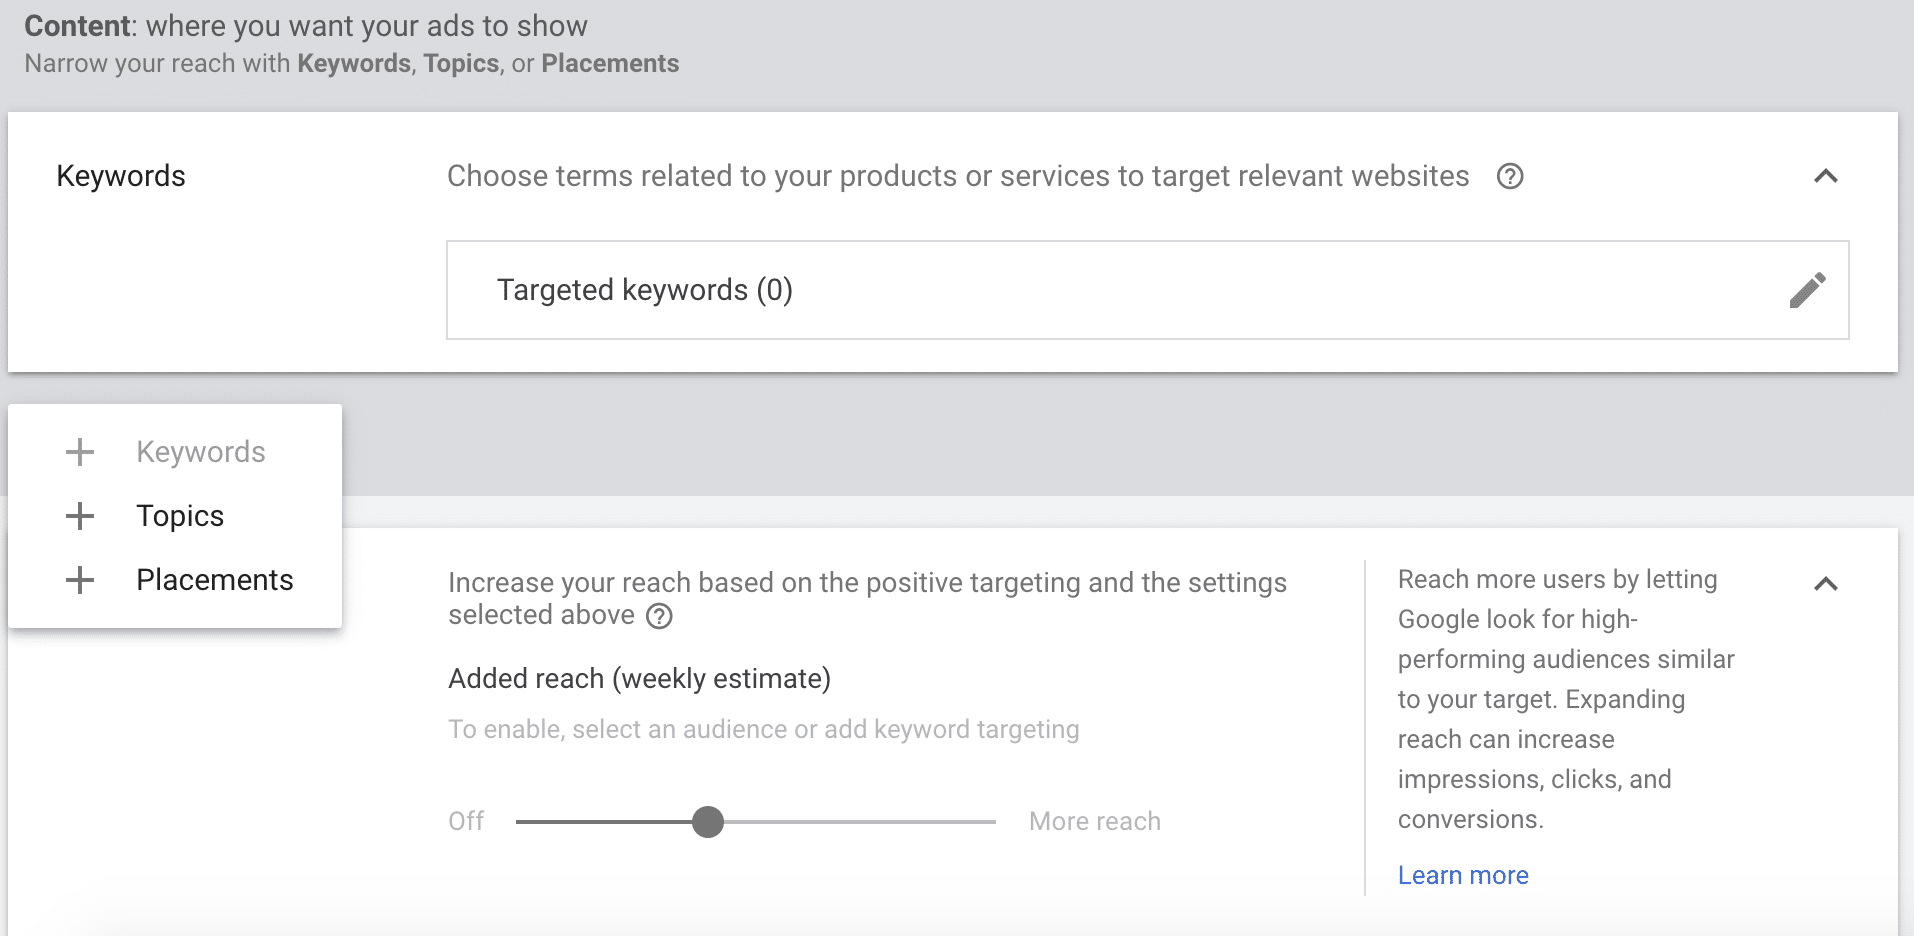
Content Targeting – Narrowing Your Audience
In the Content Targeting section, you can narrow down the places you’d like your content to appear on by adding keywords, topics or desired website placements. In the placement tool, you can even enter specific URLs you’d like to be featured on under “Enter.”
Targeting Expansion – Expand Your Narrowed Audience
Next, you’ll be asked if you’d like to use the Targeting Expansion tool. Targeting expansion takes the information you just entered into Content Targeting and uses it to increase your reach. That means it will find places to run your ad that fit within your given parameters.
So, if you say you’d like to run your bakery ads on The Food Network, Targeting Expansion might say, “Hey, Martha Stewart’s website could be another good fit!”
Ad Group Bid
This is where you’ll determine how much you’d like to spend on a single ad bid.
Just like Search Ads, Display Ads go through a bidding auction, and your ad group bid is how much you’d like to bid for ad placement.
Viewable CPM will automatically be your chosen ad bid strategy after choosing viewable impressions in the Bidding section. By using a Viewable CPM (vCPM) bid for Viewable Impressions, you’re bidding on the “actual value of your ad appearing in a viewable position on a given placement.” Google recommends keeping your vCPM as high as you can (within your daily budget) as that will make your ad bids more competitive and successful.
6. Create Your Ads
Now it’s time to pull up your ads, images and copy!
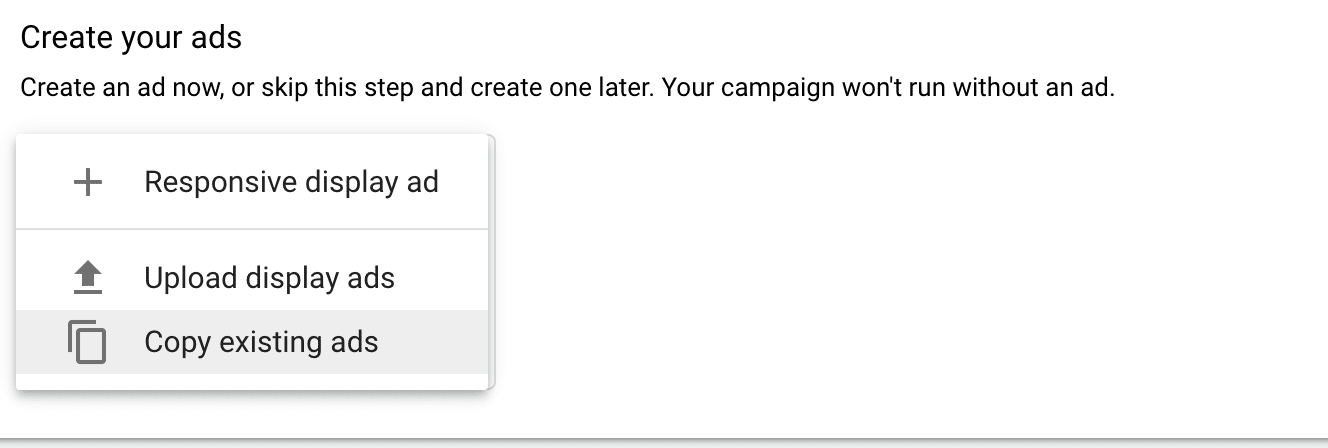
If you’re uploading non-responsive ads, click the “New Ad” plus sign and choose “Upload Display Ads.” Then, enter your final URL or the place you’d like to send your audience when they click on your ad.
For responsive ads, click the “New Ad” plus sign and choose Responsive Display Ad.
Making a responsive ad on Google is a breeze, especially if you’ve put together your content ahead of time. First, click upload images. Google will scan your website for potential options, and you can choose to use those, upload your own or pick a stock image. We suggest using your own content, though, and always making sure you have permission to use every image you add to your campaign.
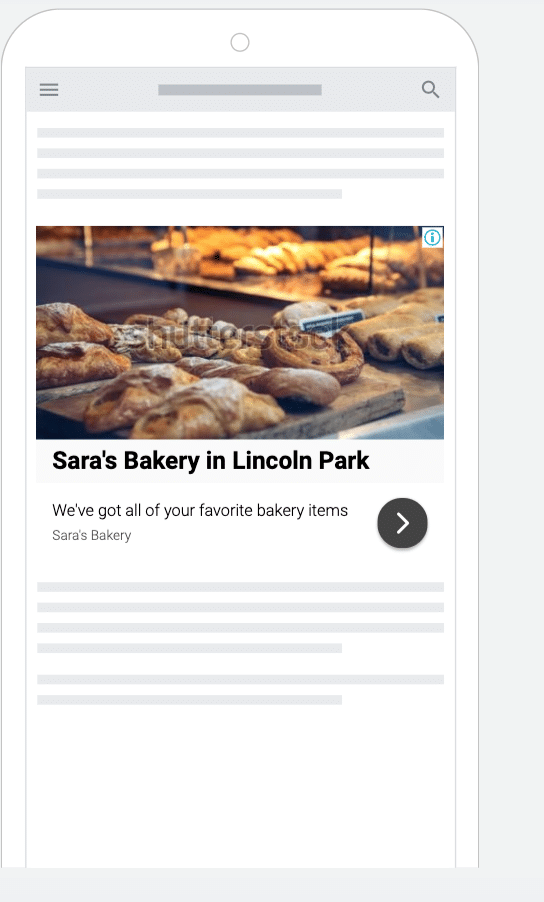
Here’s an example of a responsive as for my very real, very successful bakery.
Responsive ads require both landscape and square sizes of your image, but Google will help you size them correctly.
Next, you’ll add a variety of headlines (long and short, which means they have different character limits), descriptions and your business name. Google will give you previews of how your ads will look in different spaces, and you can adjust your copy or photos as necessary.
Make sure to stay within your character limits and keep your copy concise. Try to advertise your business clearly in as few characters as possible.
Now that you’ve conquered putting together your first ad for your ad group, creating one or two more should be much easier! Repeat this ad group process until you have 2-3 ad groups with at least 3-4 ads in each one.
Looking for help crafting copy and designs for your Display campaign? Check out Google’s best practices recommendations!
Publish Your Display Ad Campaign!
Now, you finally get to press “Create Campaign” and send your ads out to the world! By now, you should feel confident launching an effective Display campaign to level up your marketing strategies.
This can be a lengthy process for a busy small business, so it’s not uncommon to need some help. If you’re interested in advertising on Google (or other platforms!), let’s talk. Our team can take the reins and get you advertising on Google in no time.